6

I currently finished adding all the needed attributes for my research. I would like to map these attributes. Is there any way to do so? The original method I was taught was to select: on the map and then add the attributes individually.

However, I added the attributes first by mistake. As in when I was editing the attributes table, I simply selected the "add feature" option. So when I select a row and click "zoom to row on map" it says "geometry is NULL". So is there a way for me to choose a row (each row is a location of a city) and map that row on the map?

3 Answers 3

10

You can add a geometry to an existing feature which has no geometry:

  1. Put the layer in edit mode
  2. Select the feature from the attribute table
  3. Use that "add part" tool from the "Advanced Digitizing Toolbar": enter image description here
  4. Draw the geometry you want to attach to the feature
1
  • 1
    By far the easiest solution :)
    – Joseph
    Commented Apr 3, 2017 at 10:16
7

You started by adding a table without geometries. Never mind. Keep it that way. IMPORTANT : make sure every line in your non-geometry table has a unique ID.

  1. Create entities you need in one or multiple geometric layer where you will make sure there is an ID field or even import them from elsewhere (exemple a point ID/X/Y table).
  2. Make sure the unique ID of the non geometric table row is assigned to the geometry layer in the ID field.
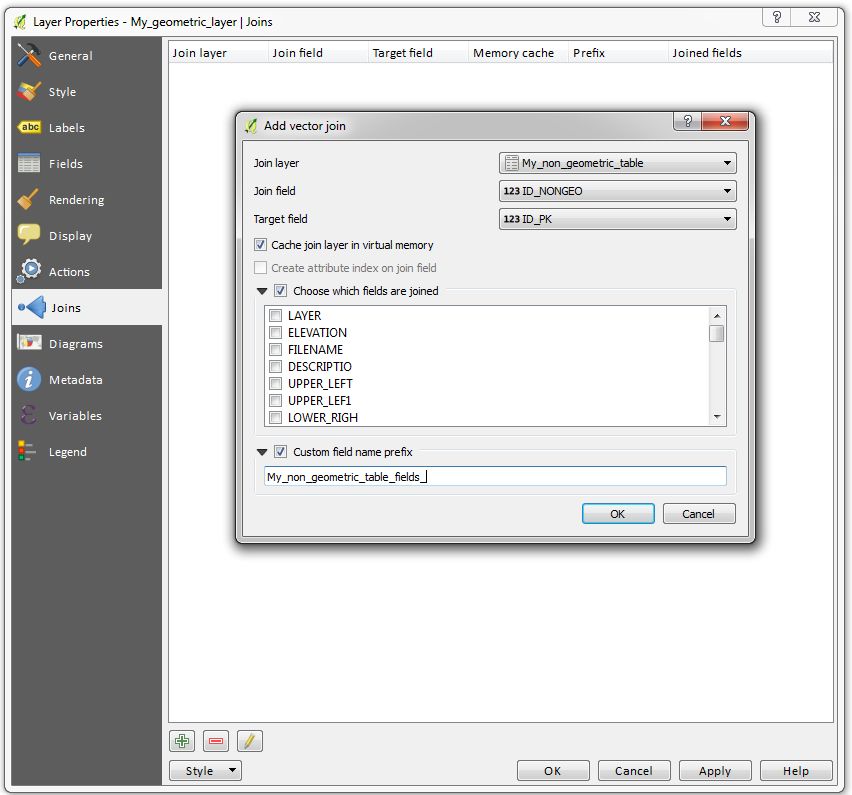
  3. Go in the properties of your geometric layer, then "JOINS" tab
  4. Clic on the "+" sign in the bottom to add a joined table
  5. Choose your non geometric table as the join layer
  6. Choose the JOIN FIELD : it must be the unique ID field in your non geometric table. Remeber : this field is supposed to have non-duplicated values.
  7. Choose the TARGET FIELD : it must be the ID (unique or not) of your geometric table. It must be the same as the row your trying to import. Note you can have multiple geometries with the same ID if needed, the attributes will then be duplicated across the multiple geometries.
  8. Choose if needed the fields you want to import by ticking their names
  9. If you need to customize a prefix on the imported fields, you can enter a value or leave the default. You can tick the custom field box and delete everything written, so you will have the original fields, but make sure a similar named field doesn't exist in your geometric table. Example : prefix "CSV_" will transform a field named "MYFIELD" in "CSV_MYFIELD"
  10. You can do the same join action with as many geometry layers you need, based on your non-geometric table.
  11. If you want to save this in the geometric layer, you need to "save the layer as" (export the geometric layer) once you finished joining.

As you can see, your joined layer can be a shapefile with no geometry or aswell Excel or CSV based, for example. Helpful to make external changes without a GIS software.

TIP if the join operation doesn't work : You might have problems joining features if the ID fields are not of the same type (ex : String and Integer). In this case, just create a new field with the right type.

Please comment if it's unclear.
Joins

2
  • Sorry but your post confused me as im so new to this. How do i create multiple entities? In a geometric layer? Each of my features does have a numbered id. o basically I can create points on the map and match the points to the ids on the attributes table? Commented Mar 29, 2017 at 19:30
  • That's it ! One table with ids and various infos in columns, a layer of geometric point table with ids and join both :)
    – gisnside
    Commented Apr 3, 2017 at 8:18
6

You could:


  1. Create the required geometry in your shapefile for a row you're interested in.

  1. Don't add any attributes for this geometry.

  1. Go to your Attribute Table and select the row containing the geometry and the row containing the associated attributes.

  1. Click the Merge Attributes of Selected Features tool:

    Merge attributes


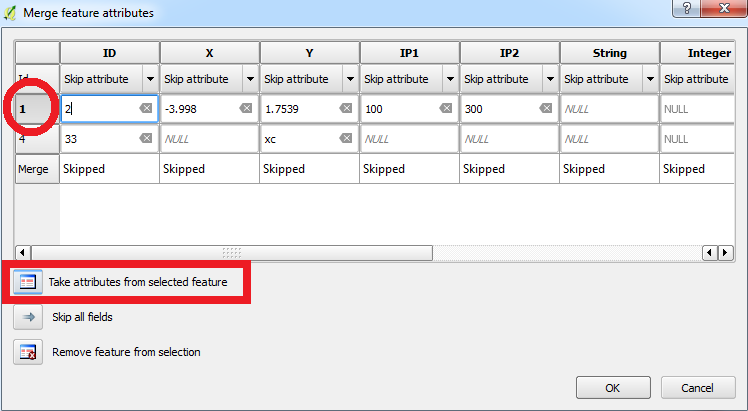
  1. Select the row containing the attributes:

    Merge feature attributes


  1. Click the Take attributes from selected feature.

  1. Rinse and repeat.
2
  • Thank you for the help! But how do I create the required geometry? I'm afraid this is all very new to me. Commented Mar 29, 2017 at 16:01
  • @new_researcher - You can create a feature by selecting a layer, clicking the Toggle Editing button on the toolbar and then click the Add Feature button. For polygons and lines, you need to draw it using the left mouse button and when you're finished, click the right mouse button. For points, just the left mouse button is enough.
    – Joseph
    Commented Mar 30, 2017 at 8:57

Your Answer

By clicking “Post Your Answer”, you agree to our terms of service and acknowledge you have read our privacy policy.

Not the answer you're looking for? Browse other questions tagged or ask your own question.