8

I am using QGIS 2.14.14. I am styling point markers in a layer that I imported using "Add Delimited Text Layer". I want to style the markers based on three properties:

  1. Color of marker relates to study name
  2. Size of marker relates to number of soil samples at that location

(I have successfully completed the first two requirements, especially with the help of this post: How to style points in QGIS based on multiple attributes).

I used a categorized style and made a color gradient to create the different colors for the studies, and I used the "size assistant" to change the size of the marker.

3. Shape of marker denotes if the soil samples were taken in "topsoil" or "other".

Specifically, I would like the shape to be a square if it's taken from "topsoil" and a circle if it's taken from "other".

I can not find a way to change the shape based on a condition or a certain value in my attributes table. I have tried making a column that's a whole number field and binary (1 for topsoil, 2 for other). I have also tried making a text field ("Topsoil" for topsoil and "Other" for other).

Does anyone know of a way to successfully combine these three formatting conditions? Specifically, does anyone know how to conditionally format a marker shape based on some attribute?

1
  • Welcome to GIS SE! Please, see if my answer fits your needs. (P.S. Nice nickname!) :)
    – mgri
    Commented May 11, 2017 at 19:36

2 Answers 2

12

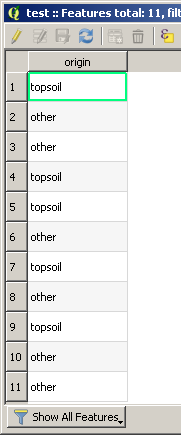
Assuming to start from a point layer having this Attribute Table:

enter image description here

you can perform the third step:

"Shape of marker denotes if the soil samples were taken in "topsoil" or "other"."

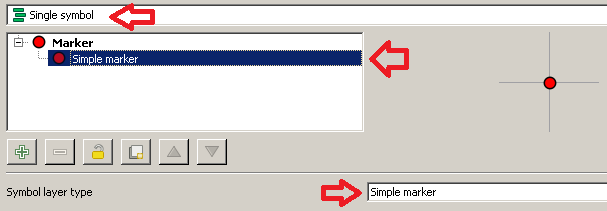
by firstly going to Properties >> Style and then applying these settings:

enter image description here

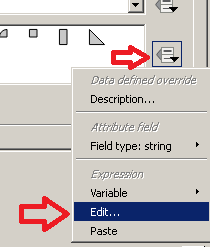
Once you have done this, click Edit... from the button near the several symbols:

enter image description here

and type this expression:

CASE
WHEN
"origin" = 'topsoil' THEN 'square'
WHEN
"origin" = 'other' THEN 'circle'
END

Finally, click the Apply button for applying the changes and you will get something like this (you may then adapt sizes and colors as you want):

enter image description here

2
  • 1
    This did the trick! However, formatting the shape wiped my color and size settings. So it seems like formatting the shape needs to be the first step in these cases. Thank you! Commented May 11, 2017 at 20:19
  • 1
    @99problemsandtheyreallQGIS I'm glad it worked! Please, consider accepting the answer if you think it was helpful: it will help future users to understand how to deal with the same issue. :)
    – mgri
    Commented May 11, 2017 at 20:22
9

Another approach is to use nested Rule-based styling for "study name" and "topsoil / other" categorical fields, followed by size assistant for "sample numbers".

Starting from Layer Properties | Style , choose Rule-based where you will see only one single circle symbol.

(1) Parent rule "Topsoil or Other" - Shape

Double-click to call Rule properties dialog and set Label: Other, Filter: "condition" = 'Other', then hit OK to close.

Back to Layer Properties, click on green plus [+] button to add another rule. Then Label: Topsoil, Filter: "condition" = 'Topsoil', Change Simple marker symbol to square and hit OK.

(2) Child rule by "study name" - Color

Click and highlight the first rule (Other), and hit [Refine selected rules] button, select [Add categories to rule]. Column: "study_name" and hit [classify]. Double-click on each Symbol to assign your preferred color set. Hit OK to close. Repeat this to Topsoil category, too.

(Back again on the Layer Properties, you may find the square shape of Topsoil is not inherited to child rules. If so, please fix it by selecting square again while doing the next step.)

(3) Size of marker relates to number of samples - Size

On the Layer Properties | Style, double-click each child rule and call up size assistant (as you have done previously). Repeat this for each rule.

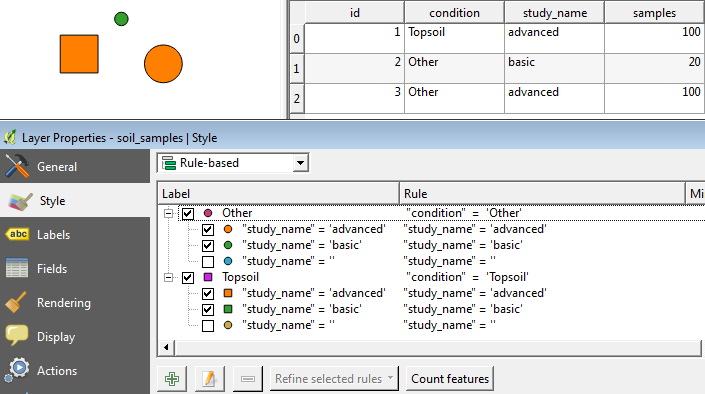
Below:

  • Bottom: The layer properties with nested rule-based styling
  • UpperLight: Sample attribute table
  • UpperLeft: Sample image after styling
  • Also note size is set as coalesce(scale_exp("samples", 10, 100, 1, 10, 0.57), 0) by size assistant.

enter image description here

This involves a lot of clicking ...tedious ... but it may be worth trying as you would have a good control over the styling.

Your Answer

By clicking “Post Your Answer”, you agree to our terms of service and acknowledge you have read our privacy policy.

Not the answer you're looking for? Browse other questions tagged or ask your own question.