12

I have a geo-tiff created by Pix4D which is about 375 Mb in file size.

I have clipped it to a smaller area using Qgis 2.8(using Raster ‣ Extraction ‣ Clipper), and the output file is about 900 MB in size.

Why did the clipping process generate such a large file, when the source file was smaller?

How do I run the clipper tool so that it produces a smaller size?

3
  • The tool makes an uncompressed image by default. Read the GDAL manual of your format and add manually the compression options into the gdal_translate command that is shown in the lowest pane. For example for GTIFF read gdal.org/frmt_gtiff.html and use for example -co COMPRESS=DEFLATE -co PREDICTOR=2 which gives a well compressed, lossless output for topographic maps. Check with gdalinfo which compression method is used in your original. It is a good candidate for the output compression.
    – user30184
    Commented May 4, 2015 at 6:49
  • For example for GeoTIFF read http://gdal.org/frmt_gtiff.html and use for example: -co COMPRESS=DEFLATE -co PREDICTOR=2 Which gives a well compressed, lossless output for topographic maps. I am getting a black image doing this
    – APR
    Commented Jun 29, 2016 at 15:24
  • Please post this as a new question, providing as much information as possible Commented Jun 29, 2016 at 16:48

5 Answers 5

10

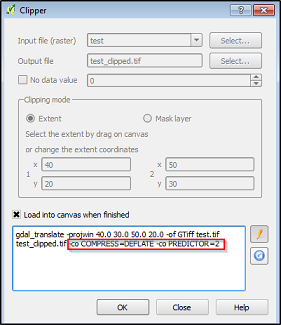
The Clipper tool makes an uncompressed image by default. Read the GDAL manual of your format and add manually the compression options into the gdal_translate command that is shown in the lowest pane.

For example for GeoTIFF read http://gdal.org/frmt_gtiff.html and use for example-co COMPRESS=DEFLATE -co PREDICTOR=2 which gives a well compressed, lossless output for topographic maps.

enter image description here

If you think that it would be trivial to add compression options to the user interface of the Clipper tool it is not because more than 30 formats are supported for the output and all of them have different settings for compression if compression is supported at all.

4
  • I agree that it is not trivial, but it has been done for the "translate" interface.
    – radouxju
    Commented May 4, 2015 at 7:34
  • 2
    Yes, but try to select for example JPEG200 output and notice that user can still make a selection between 5 GeoTIFF profiles which is plain nonsense in that context.
    – user30184
    Commented May 4, 2015 at 7:54
  • indeed, this is not yet fully consistent.
    – radouxju
    Commented May 4, 2015 at 8:08
  • Very good answer but I found that simply using COMPRESS=LZW yielded the best results - I was wondering why my 200MB Float64 image was exploding up to 19GB, even when specifying the otuput data type as Float32. Implementing this answer brought it down to about 4GB but using COMPRESS=LZW cut it down to 100MB, right about where i expected it. By the way, I was using GDAL Warp, not Clipper, but I think it also applies here. LZW is also lossless.
    – wfgeo
    Commented Oct 29, 2019 at 14:02
4

Deflate and LZW were not working for me. I selected jpeg compression and added: : -co PHOTOMETRIC=YCBCR -co TILED=YES This finally worked! Here is the article that I based this on:

http://blog.cleverelephant.ca/2015/02/geotiff-compression-for-dummies.html

3

QGIS uses gdal_translate to clip the raster and the standard output is an uncompressed geo-tiff. Tiff file, however can be compressed using, commonly, one of a couple standard compression algorithms. The first is LZW and the second is JPEG.

To set compression in QGIS's clipper module, click the yellow pencil to enable editting of the commandline at the bottom of the dialog box and add the following creation option

-co COMPRESS=JPEG

You have other options for compression depending on your output format and data. These include: COMPRESS=[JPEG/LZW/PACKBITS/DEFLATE/CCITTRLE/CCITTFAX3/CCITTFAX4/NONE] but I recommend you having a look at the GDAL GeoTiff documentation here.

Another simple alternative to editing the commandline is just to use a JPEG (if appropriate - see documentation).

2

make sure that the gdalTools plugin is installed

go to "Raster Menu -> Conversion -> Translate"

you will see a tick box for "creation option", this will allow you to select a compression. This link shows a comparison the supported lossless compression algorithm, but the performance may depend on the image.

If you want to do this at once in the clipper, you can enter your parameters manually and add the options in the command line that appear at the bottom of the clipper by clicking on the pencil icon. Those options should be added before the names of the input and output rasters.

for compression : -co COMPRESS=LZW or -co COMPRESS=DEFLATE for lossless compressions

for bigtif (if you exceed 4Go) : -co BIGTIFF=YES

for tiled images (recommended) : -co TILED=YES

to avoid unnecessary bit depth, use Byte if your data can be coded in [0-255] : -ot {Byte/Int16/UInt16/UInt32/Int32/Float32/Float64/ CInt16/CInt32/CFloat32/CFloat64}

2

The compression might be responsible for some part of the size, but the main reason is the output format of the algorithm.

I’m talking about byte , integer, float. No matter what type your dataset was, after certain algorithms, like raster-clip, the output format is automatically set to float. This leads to the increased file size, even though the extent is smaller. You have to convert the outpour with “gdal:translate” back to the format that suits your dataset. And you have to choose the “noData” value accordingly to the data type. For instance, byte, the smallest format possible, just has numbers from 0 to 255. So the noData value can not be set to -9999 and has to be 0 or so. Otherwise, the format changes automatically back to integer and your output data becomes larger again.

Your Answer

By clicking “Post Your Answer”, you agree to our terms of service and acknowledge you have read our privacy policy.

Not the answer you're looking for? Browse other questions tagged or ask your own question.