12

What I’m trying to do is label a series of point features but due to the density of point features I’m going to have to move the labels away from the point features. I then want to use a simple straight line (not an arrow) to show which label refers to which point.

I’ve used the plugin “Easy Custom Labels” to generate the labels and move them to where I want them. But what I’m unable to do is create a simple thin straight line between the point and the table.

The best I’ve achieved is to change the “symbol layer type” (Labels layer > Properties > Style) to “arrow”, uncheck “curved arrows” and uncheck “repeat arrow on each segment”. And then make the head length and thickness 0 and make the “arrow width” and “arrow width at start” as this as possible. But this still creates a chunky line. See image A.

I’ve tried setting the “symbol later type” to “simple line” but this results in lines with kinks/vertices/corners in them. See image B.

Ideally, I’d like straight lines between the labels and the feature (like in image A) that are a similar width to those in image B.

Examples of two types of labeling

2 Answers 2

12

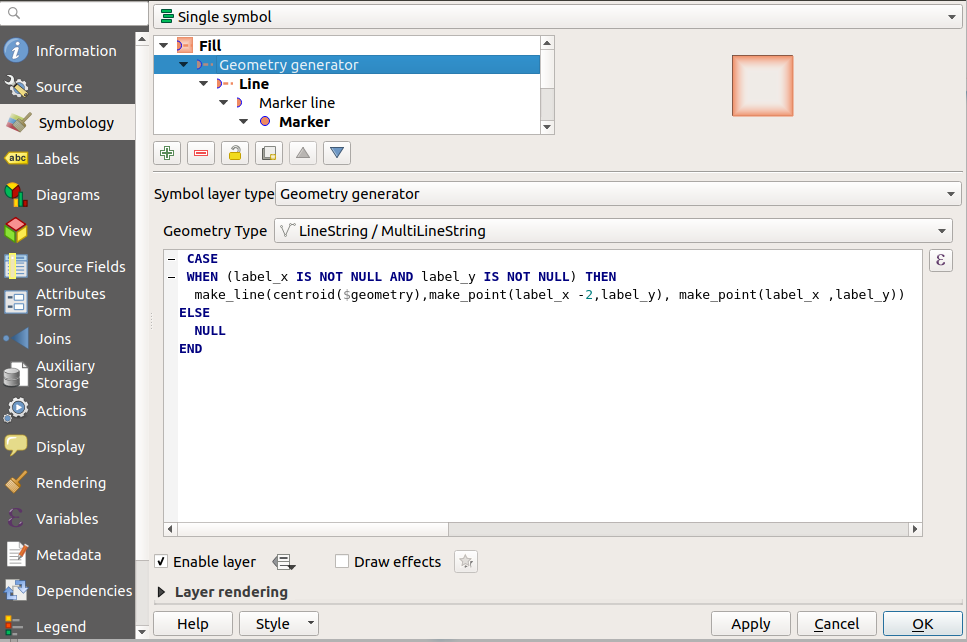
You could use an expression for to create line between label and geometry

enter image description here

Expresion:

CASE 
 WHEN (label_x IS NOT NULL AND label_y IS NOT NULL) THEN
  make_line(centroid($geometry),make_point(label_x -2,label_y), make_point(label_x ,label_y))
ELSE
  NULL
END

And this should the result:

enter image description here

2
  • Just a sidenote, if the labels are moved manually using the labeling properties toolbar and position is stored in the project, the label_x,y variables change to fields called "auxiliary_storage_labeling_positionx" and "auxiliary_storage_labeling_positiony".
    – Gabriel
    Commented Jun 27, 2018 at 12:52
  • 2
    Placing your middle point 2 units to the west as you do here make_point(label_x -2,label_y) will make the labels at the western coast look funny. Also, working at a different scale will make this useless. It would work better setting this point in relation to the distance to your label and relative position from your centroid.
    – Albert
    Commented Jul 6, 2018 at 6:57
3

Carlos' answer makes a horizontally aligned leader at the label end altough only one less point in the geometry generator gives straight lines. In my example, I moved the labels manually using the labeling toolbar in QGIS 3.0.3. Note that the technique can be found in question 232709.

The only changes I needed to make are the x,y values in my expression:

CASE
   WHEN ("auxiliary_storage_labeling_positionx" IS NOT NULL AND "auxiliary_storage_labeling_positiony" IS NOT NULL) THEN
        make_line(centroid($geometry),make_point("auxiliary_storage_labeling_positionx","auxiliary_storage_labeling_positiony"))
   ELSE
      NULL
END

As for the leader lines themselves, the symbology tree goes like this:

  • Fill
    • Geometry generator
      • Line
        • Marker line
          • Marker
            • Simple marker
          • Simple line

To make sure the leaders end at the label center, just edit the values in the labels' data defined alignment to 'Center' for horizontal and 'Half' for vertical. To style the line to whatever you need, use the simple line nested in the marker line.

Your Answer

By clicking “Post Your Answer”, you agree to our terms of service and acknowledge you have read our privacy policy.

Not the answer you're looking for? Browse other questions tagged or ask your own question.