5

ArcGIS (Map & Pro) has a nifty utility that allows you to mirror a vector layer along a line segment you give it. Before I spend time trying to write something from scratch, I wanted to see if there was a workflow where I could accomplish the same in QGIS. I need actual features here, not just displayed graphics. Here's an example of some dots and the line along which I'd like to mirror them: dots to be mirrored

I've played around with the affine and v.transform (grass) tools in QGIS 3.14. Neither appeared to allow me to issue the tool a line segment to use as the reference. I installed Vector Bender as well, but it doesn't seem to work for this use case (though the documentation is too slender to tell).

7
  • Those are raster tools... what is the arcgis tool you're referring to? Commented Sep 16, 2020 at 19:26
  • @user30184 oh I see that is a vector tool for that (and the v toolname instead of r)... my bad! Commented Sep 16, 2020 at 20:51
  • @DPSSpatial for the ArcGIS tool I think it's just called Mirror and it's one of the tools in the edit palette
    – auslander
    Commented Sep 16, 2020 at 21:43
  • 1
    Check the QAD plugin. There is a toolbar that loads that has a MIRROR command. Select the objects you want to mirror, draw 2 points of a line, and follow the commands in the command line window to keep or delete the source points. I keep getting an error, but not sure why... perhaps it will work on your data. This is a CAD-like plugin that brings many CAD features to QGIS, and there are several other CAD-like plugins that might get you the desired workflow... again, this is a CAD workflow, not really a GIS workflow, but the plugins folks are building are pretty good... Commented Sep 16, 2020 at 22:06
  • It's so close. The interface is really excellent; better even than ArcGIS, maybe. But there is a "mapping key not found" when one has to execute the mirror action. I'll follow up with the devs. Thanks!
    – auslander
    Commented Sep 17, 2020 at 20:39

1 Answer 1

4

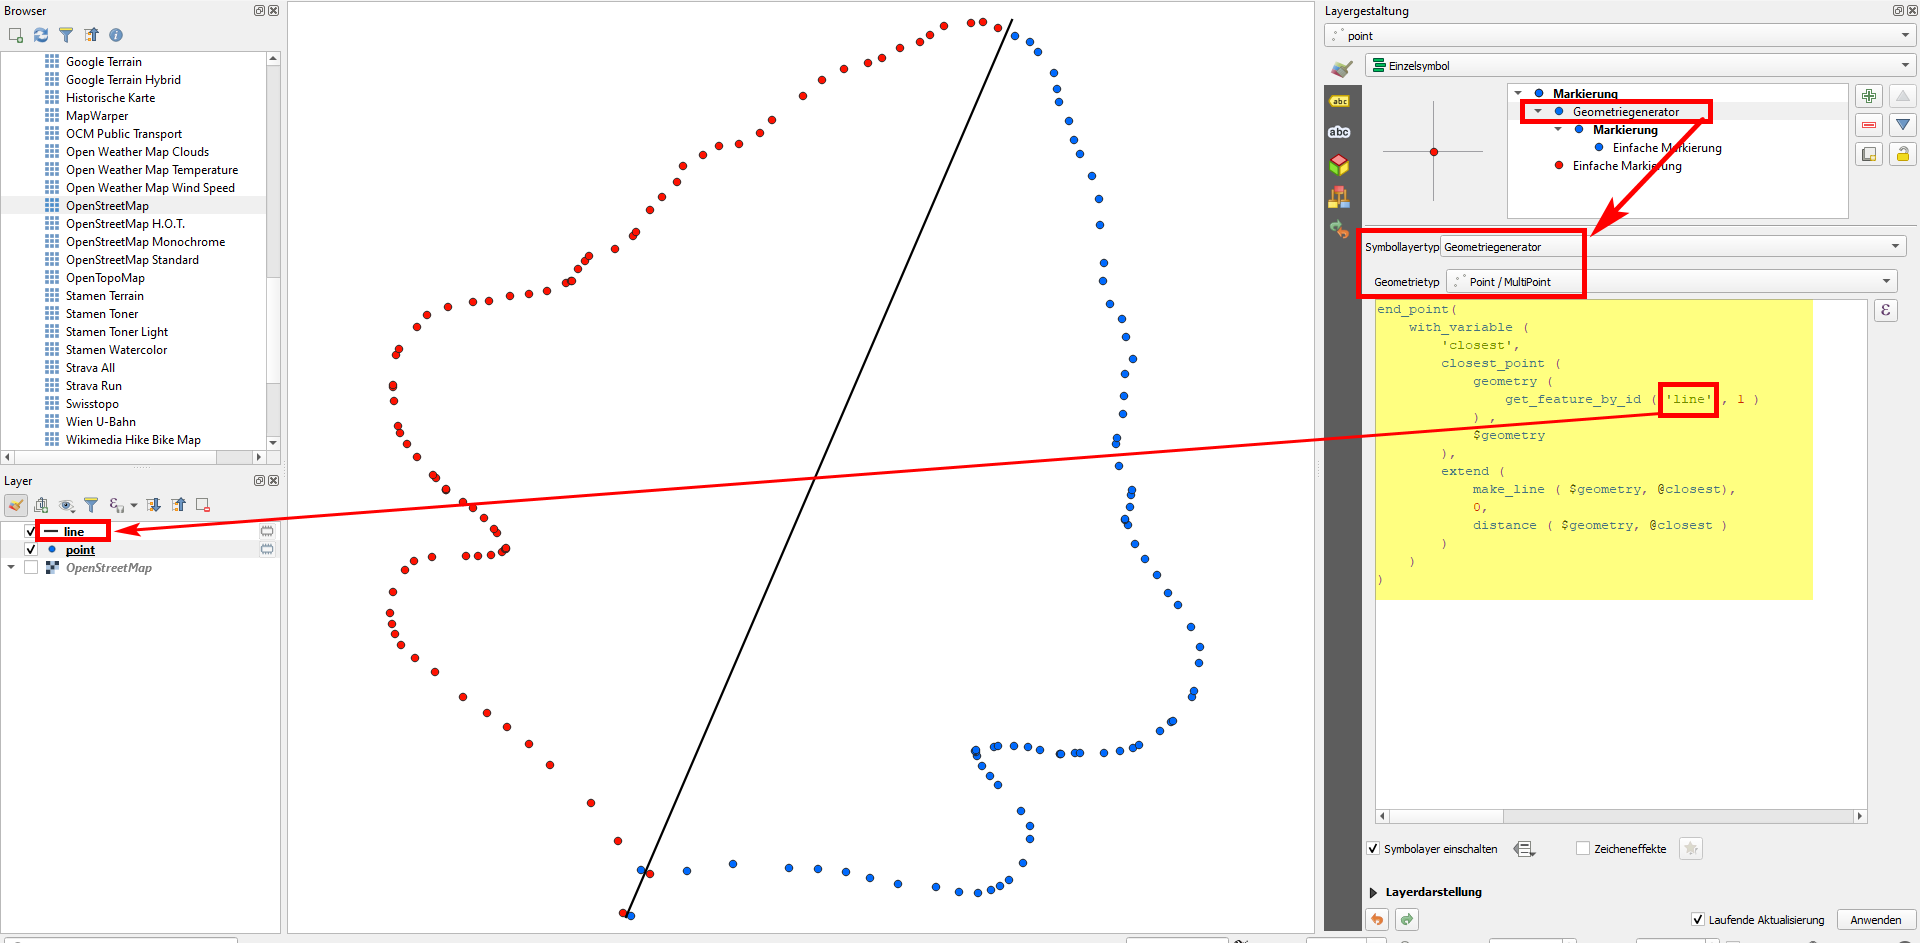
You can mirror your points along the line using QGIS expressions. You have two possibilities, 1: using geometry generator for visualization only, without creating actual geometries, but it is dynamic, so every change in the points is immediately reflected in a mirrored point, or 2:creating the points as actual geometries in a new, static layer you can use for further processing.

For both solutions, the expression remains the same (see below). In the expression, you only have to replace in line 6 'line' (red box on the screenshot) with the name of your line layer.

On the following screenshot, you see version 1 with the original points (red) and the mirrored (blue) points on the same layer, but as an additional symbol layer.

  1. Create an additional symbol layer on your point layer, set it to geometry generator, geometry type: point and paste the following expression.

  2. Menu Processing / Toolbox / Geometry by by expression. Set the point layer as your Input layer and set Output geometry type to points, then paste the following expression.

    end_point( 
        with_variable ( 
            'closest', 
            closest_point (   
                geometry ( 
                    get_feature_by_id ( 'line' , 1 ) 
                ) , 
                $geometry
            ),
            extend (
                make_line ( $geometry, @closest), 
                0, 
                distance ( $geometry, @closest )
            )
        )
    )
    

QGIS expressions mirror points line

2
  • 2
    I know it says to avoid comments like "thanks" but I'm going to go all punk rock against the rules in this case because this is an exemplary answer and should be pointed out as one. Tightly focused, great generic example, with a nice bonus visual showing it implemented in QGIS. So... "THANKS" :)
    – auslander
    Commented Dec 21, 2020 at 16:57
  • Good to know that the answer is still useful several monts after you asked. If you have further questions on how the expression works, I can explain the individual components. Basically, it's the expression closest_point that finds the closest point of each red point on the line, then connects the red point with this point on the line and extends the line at the end for the distance between red point and point on line. Finally, the end point of this extended line is the blue point.
    – Babel
    Commented Dec 21, 2020 at 17:04

Your Answer

By clicking “Post Your Answer”, you agree to our terms of service and acknowledge you have read our privacy policy.

Not the answer you're looking for? Browse other questions tagged or ask your own question.